Categories
Most Popular
Privacy Policy for Calc Suite - Complete Calculator
Saturday, September 13, 2025
YouTube - Country Search Applications
Monday, August 16, 2021
Compound Interest vs Simple Interest explained :- Calc Suite - Complete Calculator
Friday, September 26, 2025
Android Components
Sunday, August 22, 2021
Android Button with Example
Wednesday, May 26, 2021
Application Store
Sunday, August 22, 2021
Privacy Policy Version History for Calc Suite - Complete Calculator
Monday, September 22, 2025
Search This Blog
Android RadioButton With Example
Programmers Drive
Tuesday, June 08, 2021
Android RadioButton With Example
Difficulty level : Very-Easy * Last Updated On : 08th June, 2021
RadioButton is a two states button which is either checked or unchecked. If a single radio button is unchecked, we can click it to make checked radio button. Once a radio button is checked, it cannot be marked as unchecked by user. RadioButton is generally used with RadioGroup.
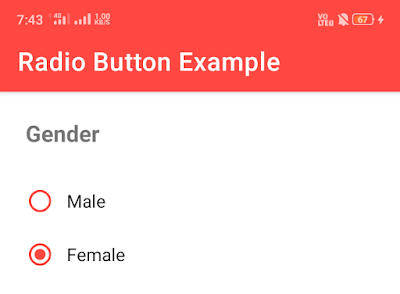
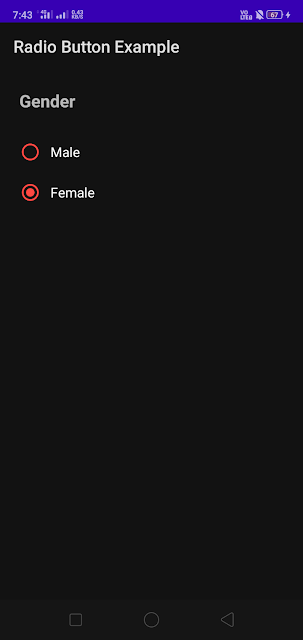
Below is the picture showing the radiobutton in light and dark mode
The Source Code for the above output is as follows: -
To display the imageview on the screen xml code is used.
XML CODE : (file name - activity_main.xml)
<?xml version="1.0" encoding="utf-8"?>
<LinearLayout xmlns:android="http://schemas.android.com/apk/res/android"
xmlns:tools="http://schemas.android.com/tools"
android:layout_width="match_parent"
android:layout_height="match_parent"
tools:context=".MainActivity"
android:orientation="vertical">
<TextView
android:id="@+id/button"
android:layout_width="wrap_content"
android:layout_height="wrap_content"
android:text="Gender"
android:textSize="18sp"
android:layout_margin="18dp"
android:padding="5dp"
android:textStyle="bold"
android:contentDescription="description"
tools:ignore="HardcodedText" />
<RadioGroup
android:id="@+id/radioGroup"
android:layout_width="wrap_content"
android:layout_height="wrap_content"
android:layout_marginStart="20dp">
<RadioButton
android:layout_width="wrap_content"
android:layout_height="wrap_content"
android:text="Male"
android:checked="true"
android:padding="8dp"
android:id="@+id/radioButton1"
android:buttonTint="@color/color3"
tools:ignore="HardcodedText"/>
<RadioButton
android:layout_width="wrap_content"
android:layout_height="wrap_content"
android:text="Female"
android:padding="8dp"
android:checked="true"
android:id="@+id/radioButton2"
android:buttonTint="@color/color3"
tools:ignore="HardcodedText" />
</RadioGroup>
</LinearLayout>
The colors that are used in the application or on the widget are written in the colors file of the android project.
COLORS FILE CODE : (file name - colors.xml)
<?xml version="1.0" encoding="utf-8"?>
<resources>
<color name="purple_200">#FFBB86FC</color>
<color name="purple_500">#FF6200EE</color>
<color name="purple_700">#FF3700B3</color>
<color name="teal_200">#FF03DAC5</color>
<color name="teal_700">#FF018786</color>
<color name="black">#FF000000</color>
<color name="white">#FFFFFFFF</color>
<color name="color1">#EE82EE</color>
<color name="color2">#FDBE3B</color>
<color name="color3">#FF4842</color>
<color name="color4">#3a52fc</color>
<color name="color5">#000000</color>
</resources>
Java file is used to write the program and all the actions that are performed on the widget while on the screen is done by the Java file.
MAIN ACTIVITY CODE : (file name - MainActivity.java)
package com.example.differentandroidcodes;
import androidx.appcompat.app.AppCompatActivity;
import android.annotation.SuppressLint;
import android.os.Bundle;
import android.widget.RadioButton;
import android.widget.RadioGroup;
import android.widget.Toast;
public class MainActivity extends AppCompatActivity {
RadioGroup radioGroup;
RadioButton male,female;
@Override
protected void onCreate(Bundle savedInstanceState) {
super.onCreate(savedInstanceState);
setContentView(R.layout.activity_main);
radioGroup = findViewById(R.id.radioGroup);
male = findViewById(R.id.radioButton1);
female = findViewById(R.id.radioButton2);
radioGroup.setOnCheckedChangeListener(new RadioGroup.OnCheckedChangeListener() {
@SuppressLint("NonConstantResourceId")
@Override
public void onCheckedChanged(RadioGroup group, int checkedId) {
switch (checkedId){
case R.id.radioButton1:
Toast.makeText(MainActivity.this, "male", Toast.LENGTH_SHORT).show();
break;
case R.id.radioButton2:
Toast.makeText(MainActivity.this, "female", Toast.LENGTH_SHORT).show();
break;
}
}
});
}
}
Note : setOnCheckedChangedListener is used to check or uncheck the radio widget.
Manifest file is generated automatically. You can view this file by clicking on the manifest option that is show the project structure image.
MANIFEST FILE CODE: (file name - AndroidManifest.xml)
<?xml version="1.0" encoding="utf-8"?>
<manifest xmlns:android="http://schemas.android.com/apk/res/android"
package="com.example.differentandroidcodes">
<application
android:allowBackup="true"
android:icon="@mipmap/ic_launcher"
android:label="@string/app_name"
android:roundIcon="@mipmap/ic_launcher_round"
android:supportsRtl="true"
android:theme="@style/Theme.DifferentStyleButtons">
<activity android:name="com.example.differentandroidcodes.MainActivity">
<intent-filter>
<action android:name="android.intent.action.MAIN" />
<category android:name="android.intent.category.LAUNCHER" />
</intent-filter>
</activity>
</application>
</manifest>
Output : -
Light Theme (Male)
Light Theme (Female)
Dark Theme (Female)
Dark Theme (Male)
Output in video format : -
Project Structure
Note : The Selected Files are the important files and the code of those files are given in this article.
Popular Posts
PRIVACY NOTICE - For Water Assessment
Sunday, March 12, 2023
Application Store
Sunday, August 22, 2021
Privacy Policy for Calc Suite - Complete Calculator
Saturday, September 13, 2025
How to use Calc Suite - Complete Calculator
Saturday, September 13, 2025
PRIVACY NOTICE - For Notebook
Saturday, March 05, 2022
Android RadioButton With Example
Tuesday, June 08, 2021
Notebook App in Android
Sunday, June 20, 2021
Highlights
Featured post
Remarques App in Android
Programmers Drive-
Tuesday, August 10, 2021


0 Comments